
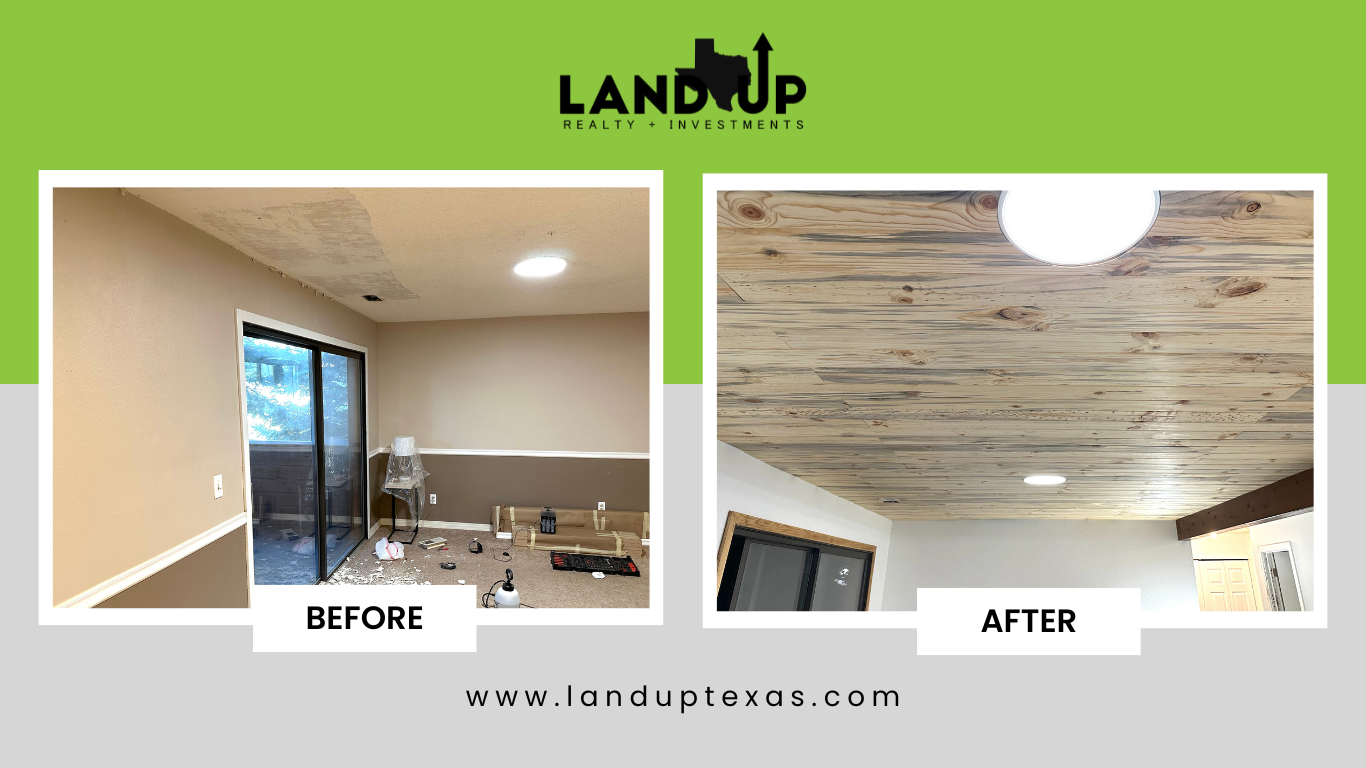
DIY: Removing a Popcorn Ceiling
The Land Up Learning Series
Popcorn ceilings are weird. There, we said it.
What possessed people to decide that their home’s ceiling needed to look like cottage cheese? Apparently, anything flew back in the 70’s and 80’s.
If you have an older place, chances are good that your ceiling has (or had) some popcorn somewhere. Removing it goes a long way to make your older home look and feel modern and updated, but it’s not always a quick-n-easy DIY project like the internet would lead you to believe. If you’re thinking about tackling that popcorn ceiling as your next home improvement project, you’re in luck - we did the work and learned some valuable lessons along the way that we’re happy to share.
Before You Start Removing Your Popcorn Ceiling
Sound Reduction
Besides ruining your life, popcorn ceilings do serve an actual function as a light noise reduction barrier. Keep in mind that removing it will not only reduce some of the protection from sounds above - especially if you have a second story - but it will also cause sounds to echo within your room if not replaced with an alternative.

There are lots of sound barrier options out there, including acoustic drywall, composite boards, and mass loaded vinyl sheeting. All of these have pros and cons, so be sure to do your research and choose an option that works your budget and space.
For example, mass loaded vinyl is highly effective at reducing noise, but it’s insanely expensive per square foot (around $4/sqft) and very heavy. Acoustic drywall is less pricey, but it’s also less effective and not always recommended for ceilings.
Replacement Material
There is more than one way to skin a cat (quick question: why are we skinning cats?). There are endless options for materials to replace your popcorn ceiling; drywall, tin titles, foam tiles, acoustic tiles, wood, etc. Before you excitedly start demo-ing your own ceiling, you’ll want to have a solid plan of what the new version should look like.
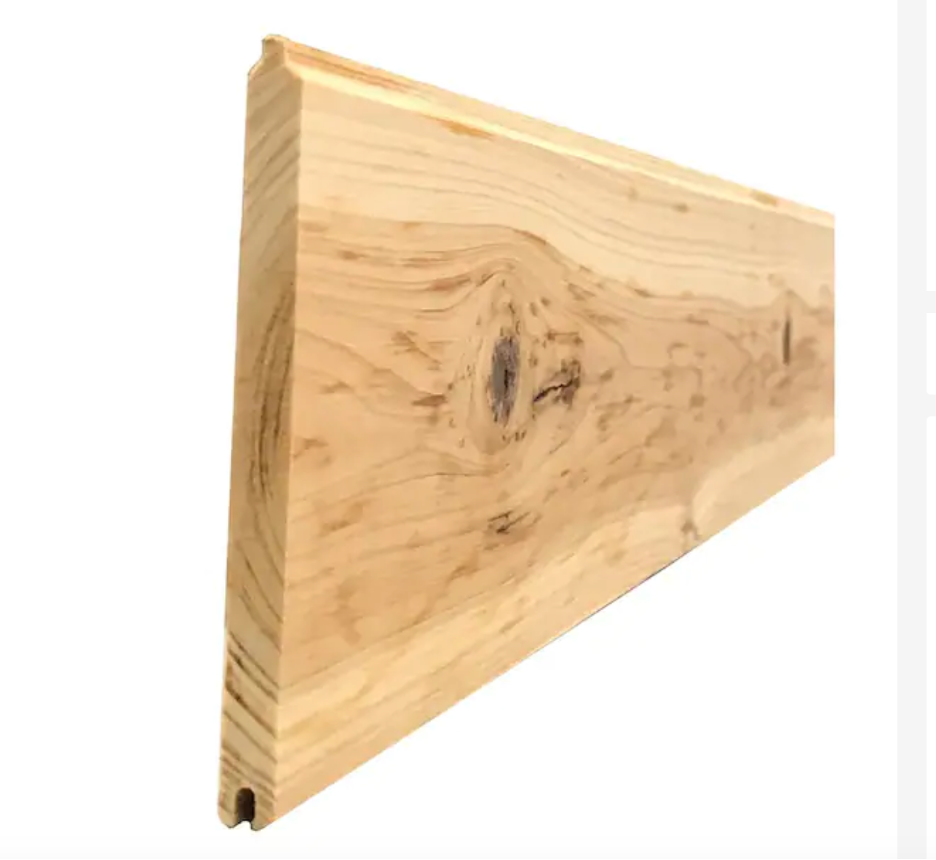
In Texas fashion, we decided to go with wood panels. This blue pine has a cool grain pattern with swathes of gray. Overall, the wood is light in color but the added gray gives the finished product a lot of character. Typically, this type of paneling has a “tongue and groove” joint, meaning that each piece has a ridge on one side that fits into a groove in the next panel - achieving an even fit and look.
Installing wood planks is a blog for another day, since right now we’re focusing on getting rid of this damn popcorn!
Required Tools
Removing a popcorn ceiling requires one set of specific tools, and putting up the new material requires a whole other set. These tools aren’t super cheap, but if you’re like us, this is just the beginning of your home remodeling journey - and you will probably need them for future projects anyway.
Supplies for removing popcorn ceiling (total: ~$255):
Asbestos test ($10)
Floor scraper ($25) - the kind with a semi-sharp blade
Plastic sheeting ($20) - to keep the mess under control
Shop vacuum ($60) - also for the mess
Ladder ($70)
Work gloves ($10)
Mask/ventilator ($20)
Goggles ($10)
Garden sprayer ($15) (optional)
Paint scraper ($15) (optional)
Removing the Popcorn Ceiling
Step 1 - Test for Asbestos
DO NOT SKIP THIS STEP! Popcorn ceilings were created back in the day when asbestos was still a thing. It was banned at the end of the 70’s, but you should always test your popcorn to see if it has asbestos in it. Test kits are less than $10 at any hardware store or online and are super easy to use. Ten bucks is worth its weight in gold to make sure you don’t inhale a bunch of toxic chemicals.
Step 2 - Prepare for the Mess
Oh yes, it will be a mess. Remove furniture, decor, loved ones, pets, and anything you don’t want getting dusty. Then, if you can, use plastic sheeting to isolate whatever room you’re working on from the rest of the house and/or cover everything around.
After removing everything from the living room, we used the sheeting to make a plastic wall to separate the room from the rest of the space. Luckily, the carpet in this room was going to be removed anyways, but if you have carpet below that you plan to keep, make sure to cover it and use painter’s tape to tape the sheet to the wall around the edges.

Here’s a lesson we learned the hard way: also tape up any HVAC vents in the room. Or you’ll end up like us, with dust redistributed all over your house.
Step 3 - Determine if the Popcorn is Painted
Whether or not your popcorn ceiling is painted will determine how hard this project will be. To figure this out, run your hand gently over the ceiling. If the popcorn starts to fall off, then you’re in luck: it’s unpainted! If it feels like you’re running your hand over sandpaper and nothing is falling, then you’re in for a workout.
Our ceiling was indeed painted :) This means you can’t use a popcorn ceiling scraper with a trash bag attachment to catch the falling material. These don’t have a sharp edge, and therefore won’t cut popcorn off from the drywall. This is where the floor and paint scraper come in handy.


Step 4 - Start Scraping
Strap on your mask and goggles (the dust WILL be a lot) and cut out a small bit of the popcorn to give yourself a good starting point. The floor scraper had a semi-sharp edge, so with the first few strokes you’ll really be learning how to make smooth passes that will not gouge pieces out of the drywall underneath the popcorn. This is harder than it sounds.
Finding a good stroke that gives enough power to take off the corn AND has even pressure on the blade is an art. Put too much uneven pressure on the scraper and the edges of the blade will catch the drywall and gouge it.
For especially tough spots, like edges and corners, we had to use the paint scraper which has a sharp blade. We wouldn’t recommend using it for large areas though because it is super easy to gouge out big chunks of your drywall by accident.
Make no mistake, this is hard work. In fact, we’d say it’s down right exhausting if the popcorn is painted. Have patience and break your project up into small sections. Our ceiling was small, about 200 square feet, and it still took us around 10 hours from start to finish.
The internet says that using a garden sprayer filled with a mixture of water and vinegar to soak the popcorn first will loosen up the paint and make the job easier. From our experience, all this did was make the drywall softer and increased the chances of gouging it. It also made the room smell like vinegar, who would have guessed?? So in our case, we skipped the vinegar bath, but it could work for you.
Step 5 - Beware of What Lies Beneath
If you hit a spot that feels harder than expected, definitely stop and inspect the area for staples, nails, and other obstacles. We ran into this regularly and had to stop and use a pair of pliers to remove staples. We also ran into a difficult spot that turned out to be a large area of patched drywall, and the popcorn there was more solid than the rest of the ceiling. This made for slow going.

Step 6 - Clean Up
Did we mention that this crap gets EVERYWHERE. Trust us, spend the time to properly cover everything up with plastic and clean up will be so much easier. We used the shop vac to grab popcorn out of floor corners, the track of the sliding door, and along the edges of the walls.
For the carpet, we simply cut it into strips and rolled up the mess along with the carpet and disposed of it properly.
The dust will build up on the other walls if you don’t cover them up. Since we planned on painting the walls anyways, we just wiped them down with a sponge and water after the project was complete.
Step 7 - Drink a Beer (or Beers)!
Take a step back and enjoy a popcorn-less view! We had several beers after this project. And ironically, a bag of popcorn.

Conclusion:
Was it worth DIY’ing this project? Honestly, probably not. If the popcorn ceiling is painted, the amount of physical effort is immense. It was truly one of the most tiring things we’ve done, and that includes reshingling roofs in Texas in July.
The going rate for someone to come in and do this professionally is about $2 per square foot (depending on your area). By the time we bought all the tools, we really didn’t save that much money. The clean up alone is probably worth paying someone to do. But if you’re like us and value being able to say you rolled up your sleeves and did it yourself, then hopefully this blog helps you on your DIY journey.